You must be signed in to read the rest of this article.
Registration on CDEWorld is free. You may also login to CDEWorld with your DentalAegis.com account.
CASE TYPES OF PERIODONTAL DISEASE
There are five case types of periodontal disease, ranging from the least to the most severe. These are described below.
Case Type I
Gingivitis: inflammation of the gingiva only (appears red and puffy, no stippling, bleeds easily, less than 4 mm pocket depth, no bone loss).
Case Type II
Early Periodontitis: inflammation progresses into the alveolar bone crest (pocket depth of 4-6 mm, early bone loss).
Case Type III
Moderate Periodontitis: increased destruction of periodontal structures (deep pockets, some tooth mobility due to bone loss).
Case Type IV
Advanced Periodontitis: severe destruction of periodontal structures (increased pocket depth, and tooth mobility).
Case Type V
Refractory Periodontitis: periodontal disease is resistant to treatment and continues to progress (usually ends with loss of the teeth).
DIAGNOSTIC PROCEDURES FOR PERIODONTAL DISEASE
Medical and Dental History
As with all aspects of dentistry, the patient's medical and dental history is an essential part of the diagnostic procedures. The medical history may reveal systemic conditions that could attribute to periodontal disease, such as diabetes. The dental history should have questions regarding the patient's current home care practices and how the patient feels about keeping their teeth, as well as symptoms that may indicate periodontal disease.
Extraoral Exam
The periodontist will usually begin the clinical examination by first observing extraoral features such as the skin and eyes. The temporomandibular joint, the lymph nodes, the salivary glands, and the lips will also be palpated.
Intraoral and Periodontal Exam
The intraoral exam will include observation of the appearance of all intraoral structures, including:
• sensitivity of teeth
• migration, or shifting, of teeth
• defective restorations or improperly fitting appliances or prostheses
• the presence of plaque and calculus, both supragingivally and subgingivally
• the color, size, shape, consistency, texture, and bleeding of the gingiva
• the amount of bleeding (healthy gingiva does not bleed)
• the amount of exudate
• tooth mobility - measured on a scale of 0-3, with 0 being no mobility, 1 being slight (1 mm of movement), 2 being moderate (2 mm of movement), and 3 being severe (3 mm of movement)
• furcation involvement
• presence of recession
• depth of periodontal pockets - measured in six different areas on each tooth (MF, F, DF, ML, L, DL)
• signs of bruxism, clenching, or improper occlusion - which places excessive forces on the teeth that may lead to bone loss.
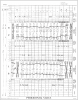
All of this information is recorded in the patient's record. There are many forms available for recording the periodontal examination, and the dental assistant must be familiar with the forms as well as the charting notations and symbols used by the dentist. Figure 1 illustrates a periodontal chart.
A periodontal chart is also referred to as a gum chart. It is a graphic chart the dental team uses for organizing the information about patient's gingival health. Periodontal charting is the best way to uncover the difference between patients that are periodontally healthy and those with periodontal disease.
The area between the gingiva and tooth is known as the sulcus or pocket. Periodontal charting is normally done at each visit to monitor gingival health. This measuring is done with a periodontal probe in millimeters in the cuff of the gum line and the point at which the gum actually attaches to the tooth.
Healthy gums have pockets that are usually 2-3 mm, anything over 5 mm means the bone that supports the tooth is being degraded by periodontal disease. Bleeding is also a sign of gingivitis and gum disease, as healthy gums do not tend to bleed.
0-3 mm without bleeding - great oral hygiene with no signs of gingivitis.
1-3 mm with bleeding - signs of gingivitis. Improved at-home oral care as well as further dental prophylaxis are prescribed.
3-5 mm with no bleeding - this means there is the potential for periodontal disease. A routine cleaning cannot go below 3 mm, so further in-depth visits to the dentist will be needed.
3-5 mm with bleeding - early stages of gum disease, the beginnings of periodontitis. This may require additional treatment, better home care, and three to four visits to the dentist per year.
5-7 mm with bleeding - this means soft and hard tissue damage, as well as bone loss. Definitive treatment is required, over several visits, with greatly improved home care and many more hygiene visits to prevent tooth loss.
7 mm and above, with bleeding -this is advanced-stage periodontal disease and aggressive treatment is needed in order to save the dentition. Surgery will probably be needed to repair the bone loss. Periodontal maintenance is definitely required frequently.
When charting, the assistant will verify where the dental practitioner will be starting the probing. It is also important to know what teeth are missing and to notate on the chart prior to beginning the documentation. Most dental professionals will begin on the patient's upper right on the DB of the most posterior tooth present. The next reading would be the buccal (B) of that same tooth, followed by the MB reading on that tooth before moving onto the next tooth. When the midline is crossed, it is usually verbally mentioned to confirm position of probing to the documented charting. Once the dental team member reaches the upper left DB reading of the most posterior tooth, they usually swing around and do all of the lingual readings back to the patient's upper right quadrant. The team member then drops down to the mandibular arch and either begins on the distolingual or distobuccal surfaces of the most posterior tooth present. The process is repeated until the entire dentition is charted. Bleeding points are noted with a red circle around the reading on the surface of any tooth that bleeds upon probing. Mobility or movement of a tooth is noted with a 0, 1, 2, or 3, and furcation involvement is noted with Roman numerals I, II, III. Reading for probing that are 0-3 are marked in blue and anything over a reading of 3 is marked in red.
Radiographic Evaluation
Radiographs, when used in conjunction with the clinical examination, are an important aid in evaluating periodontal disease because they can help determine the pattern, distribution, and severity of bone loss. They also allow the dentist to document the progression of the disease.1 The pattern of bone loss can be vertical (on individual teeth on the interproximal surface) or horizontal (occurring in a plane parallel to the cementoenamel junctions of adjacent teeth). The distribution can be localized (in an isolated area), or generalized (occurring evenly throughout the oral cavity). The severity can be mild (bone loss of up to 30%), moderate (bone loss of 30%-50%), or severe (bone loss of 50% or more).
Study Models and Photographs
Study models and photographs also provide the dentist with a means of evaluation and documentation of the patient's oral conditions.
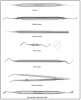
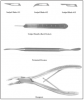
PERIODONTAL INSTRUMENTS
Some of the instruments that are used in periodontics are shown in Figure 2a and Figure 2b. These include the explorer, periodontal probe, curettes, and scalers (manual and ultrasonic). In addition, the periodontist may use the following instruments:
Chisel Scaler
A chisel scaler is used to remove supragingival deposits from the interproximal areas of anterior teeth.
Hoe Scaler
A hoe scaler is used to remove heavy supragingival deposits on the buccal and lingual surfaces of teeth, usually the posterior teeth.
File Scaler
A file scaler is used for crushing heavy calculus deposits, for root planing, and for removing overhanging margins of restorations.
Pocket Marker
A pocket marker looks similar to cotton pliers, but one beak is straight and thin and one is bent at a right angle at the tip. The straight end is placed inside the pocket and when the beaks are pinched a pinpoint perforation is made on the gingival tissue, which corresponds to the base of the pocket. The markings are used to outline the area for a gingivectomy, which will be described later.
Periodontal Knives
Periodontal knives, such as Kirkland knives, are used to remove gingival tissue during periodontal surgery. Orban knives are used to remove interdental tissue.
Surgical Scalpels
Scalpels, sometimes referred to as a Bard-Parker, is a blade or knife that is used to make an incision. They are available with reusable or disposable handles. The blades are always single use and are disposed of in the sharps container. The blades are available in a variety of sizes and shapes. Extreme caution must be used when placing the blade on the handle and when removing the blade.
Periosteal Elevators
Periosteal elevators are used to lift and reflect (retract) incised soft tissue.
Rongeurs
Rongeurs, or nippers, are similar to a pair of pliers. They are used to clip soft tissue tags and to remove sharp pieces of bone.
Electrosurgery
Electrosurgery uses tiny electrical currents to incise the gingiva and to coagulate the blood during the procedure. The cutting tips are available in a variety of shapes for various uses. It is important that the dental assistant keep the oral evacuator tip near the surgical site in order to remove the odor of the burning tissue.
NONSURGICAL PERIODONTAL TREATMENTS
The type of treatment for periodontal disease will depend on the severity of each case. In order for the treatment to be effective, however, the patient must be positively motivated and take an active role in his/her treatment by following through with a daily personal oral hygiene program. Treatment will often require several appointments, and usually begins with conservative, nonsurgical techniques.
Scaling
Scaling involves the complete removal of plaque and calculus from the teeth. During a routine prophylaxis, the plaque and calculus are removed from above and just below the gingival margin. This is performed when a patient has gingivitis, or Case Type I periodontal disease. A periodontal scaling involves the removal of subgingival calculus in deep periodontal pockets. For this procedure, the patient will usually be scheduled to have only one or two quadrants scaled at a time and a local anesthetic is often administered.
Root Planing
After the calculus has been removed from the root surface, the cementum may be rough. These rough areas will provide an ideal place for plaque and calculus to accumulate once again. Root planing is the process of planing, or shaving, the root surface with a curette to make it smooth, preventing the accumulation of plaque and calculus. Scaling and root planing may be performed when a patient has Case Type II or III periodontal disease. In some cases, gingival curettage is required.
Gingival Curettage
Gingival curettage is the process of removing the necrotic tissue from the wall of the periodontal pocket. A curette is used to scrape the damaged tissue. This procedure is performed after scaling and root planing. After scaling, root planing, and gingival curettage, the patient is instructed to take a mild analgesic for discomfort, and to avoid spicy foods, citrus foods, and alcoholic beverages. The patient is also instructed to avoid smoking, which will delay healing. The dental team must also stress good home care.
Antimicrobial and Antibiotic Treatment
Antimicrobial mouthrinses and antibiotics are sometimes used in conjunction with scaling and root planing. Chlorhexidine is a commonly used antimicrobial mouthrinse. The patient may also be prescribed a systemic antibiotic. Another method of adjunctive treatment consists of inserting fibers impregnated with the antibiotic tetracycline into the gingival sulcus.
Occlusal Equilibration
Some degree of occlusal forces helps to keep the periodontium healthy. Excessive forces, as mentioned earlier, may be damaging. Forces that move the teeth out of position may injure the periodontal tissues.2 Occlusal trauma may accelerate pocket formation (though it does not cause pocket formation), cause tooth mobility, bone loss, tooth migration, and temporomandibular joint disorders.3 In order to eliminate occlusal interferences, the dentist may perform an occlusal equilibration. During this procedure, the occlusal interferences are located with articulating paper and are removed by selectively grinding the teeth with diamond burs. The procedure is usually done quadrant by quadrant and may require several appointments to equilibrate the entire mouth. The teeth are polished with rubber wheels after the grinding is complete.
Patient Education and Home Care
The patient should not only be taught good home care techniques such as brushing and flossing, but he/she should also be instructed on other periodontal aids, such as interproximal brushes or irrigation, which are appropriate for his/her situation.
SURGICAL PERIODONTAL TREATMENTS
When the conservative treatments described above are not successful, it may be necessary to perform a surgical procedure in order to treat the periodontal disease. Periodontal surgery may accomplish the following3:
• reduce or eliminate periodontal pockets
• create or improve access to the root surface
• correct bone defects
• create new attached gingiva
Some of the common surgical procedures are described below.
Gingevectomy
A gingivectomy is performed in order to eliminate the periodontal pocket. This procedure involves the cutting away of the diseased gingival tissue that forms the pocket. A pocket marker is used to mark the depth of the pockets and then the gingival tissue is removed with a periodontal knife, a scalpel, or electrosurgery.
Gingival Graft
A gingival graft involves taking tissue from a donor site, usually the palate, and placing it on another site, usually an area of severe recession. The graft tissue is sutured in place and both the donor site and the graft site may be covered with a periodontal dressing to allow healing to take place.
Periodontal Flap Surgery
Periodontal flap surgery involves the surgical separation of the gingiva from the underlying tooth roots and alveolar bone. The flap of tissue is retracted with a periosteal elevator and the periodontist is then able to scale and plane the exposed roots, and/or recontour the alveolar bone. The flap is then repositioned and sutured in place. A periodontal dressing may be placed over the site to protect it.
Osseous Surgery
Osseous, or bone, surgery is performed in order to correct defects in the alveolar bone. A flap is made and the bone is either removed (subtractive osseous surgery), or augmented with bone from a donor site (graft) or augmented with a bone substitute (additive osseous surgery).
SUTURE PLACEMENT AND REMOVAL
Often it is necessary to place sutures at the surgical site. Sutures are placed in order to hold the tissues in the proper position during healing. They consist of a curved needle attached to the suture material. The needles are available in various sizes, and the suture material is available in absorbable (which will not need to be removed) or non-absorbable material (which will need to be removed). The supplies needed for placement of sutures include the suture material, hemostat (which looks like a pair of scissors, but has serrated beaks and locking handles and is used for grasping and holding objects or tissue), needle holder (which is similar to a hemostat, but has a groove in the beaks for holding the needle), suture scissors, and gauze sponges.
The assistant will prepare the sutures by placing the needle holder in the correct position on the suture needle, usually with the tip of the holder just grasping the needle at right angles and about two thirds of the way from the tip of the needle. While the dentist is placing the sutures, the assistant should keep the suture off the patient's face, retract tissues as needed, and maintain visibility. The dentist may have the assistant cut the finished sutures at the length indicated, usually 2-3 mm of suture material beyond the knot. The number of sutures placed is usually recorded in the patient's record. Sutures are usually left in place for 5-7 days. They should not be left longer than this because they may increase the contamination of the underlying tissues.4 Prior to removal of the sutures, the dentist must check the site to evaluate healing. If the healing has progressed satisfactorily, the sutures can be removed. In some states, the assistant is allowed to remove sutures. The assistant should check the patient's record to find out how many sutures were placed. The area should be cleaned gently with a cotton-tipped applicator that has been soaked in hydrogen peroxide. Using cotton pliers, the knot of the suture is gently held away from the tissue. The sutures are cut as close to the tissue as possible by slipping one blade of the suture scissors under the suture. The knot is gently pulled toward the incision line, so that the suture slides through the tissue. The knot is never pulled through the tissue. Suture material that has been exposed in the oral cavity should not be pulled through the tissue, because it is contaminated with oral bacteria and debris.5 The sutures are placed on a gauze as they are removed and then counted to be sure all have been removed.
SURGICAL DRESSING PLACEMENT AND REMOVAL
A periodontal dressing is often placed over the surgery site following the procedure (Table 1). The dressing acts as a bandage for the site, protecting the tissues from trauma during the healing process. It also helps to reduce postoperative discomfort, infection, and hemorrhage, and it helps to support mobile teeth. Depending on the state practice act, some states allow a dental assistant to place and remove a periodontal dressing. Periodontal dressings are available in three types: zinc oxide-eugenol materials, non-eugenol materials, and light-cured materials. Zinc oxide-eugenol dressing materials are supplied as a powder and liquid that can be mixed before the procedure and stored until it is needed. The eugenol in these materials may cause an allergic reaction for some patients, with redness and a burning sensation in the area. Non-eugenol materials are more commonly used because they do not produce allergic reactions. They are supplied as a two-paste system; they are dispensed in equal portions and mixed immediately prior to use. Light-cured materials are supplied in a syringe-type dispenser that requires no mixing. They can be injected directly onto the surgical site and molded into place.
POSTOPERATIVE INSTRUCTIONS
Following periodontal surgery, the patient should be given both oral and written postoperative instructions. These instructions could include the following (depending on the situation):
1. Do not eat or drink for 2 hours after the surgery.
2. Eat a normal diet, but avoid hot, spicy, and hard foods, citrus fruit, and alcoholic beverages. Chew on the opposite side of the mouth.
3. Mild to moderate discomfort may be experienced. Take the medication as instructed on the prescription given.
4. Do not rinse for the first 24 hours. After that time, rinse frequently with warm salt water (1 tsp. of salt in 8 oz. of water).
5. Brush and floss as normal the areas of the mouth not involved in the surgery. Brush only the biting surfaces of the teeth involved in the surgery. If there is no periodontal dressing, brush and floss carefully, but do not bring the floss under the gumline.
6. If the patient has sutures, but no dressing, they should remain in the area for about one week. Some sutures may loosen and be lost. Do not be concerned unless there is bleeding.
7. If a periodontal dressing has been placed:
- The dressing should remain in place for about 7-10 days.
- Clean the outside of the dressing with moistened cotton swab.
- Avoid "playing" with the dressing with tongue or fingers.
- Small pieces of dressing may break off. This is normal. If large pieces break off, or if the entire dressing is lost, call the dental office.
- If there is obvious bleeding under the dressing, call the dental office.
8. Avoid excessive exercise for the first few days.
9. Some swelling may occur. Place an ice pack on the face over the area for ten minutes, remove for ten minutes. Repeat as needed.
10. A slight amount of seepage may occur; if it is excessive, call the dental office.
11. Call the dental office if any heavy bleeding, severe pain, or any other unexpected symptom is experienced.
12. Return to the dental office for a follow-up visit (usually about 1 week after surgery) at the scheduled time. At this time, the area will be evaluated and the sutures/periodontal dressing will be removed.
REFERENCES
1. Haring, Joen Iannucci, and Lind, Laura Jansen. Dental Radiography: Principles and Techniques. Philadelphia: W.B. Saunders, 1996.
2. Miyasaki-Ching, Cara M. Chasteen's Essentials of Clinical Dental Assisting. 5th ed., St. Louis: Mosby, 1997.
3. Bird, Doni, and Robinson, Debbie. Torres and Ehrlich Modern Dental Assisting. 8th ed., St. Louis: Elsevier Saunders 2005.
4. Finkbeiner, Betty Ladley, and Johnson, Claudia Sullens. Mosby's Comprehensive Dental Assisting: A Clinical Approach. St. Louis: Mosby, 1995.
5. Phinney, Donna J., and Haldstead, Judy H. Delmar's Dental Assisting: A Comprehensive Approach. 2nd ed.; Clifton Park, New York.